VPN for Router

Choose your router

How to Secure Your Home Wi-Fi Network
with a Router?

1. Check Your Router
for VPN compatibility
Follow our guide.
2. Get the Settings
2. Get the Settings
Use the code you received
upon payment or trial request.
3. Set Up VPN on the Router
Now all connected devices are
protected and have access to the
required resources.

Choose a Router for Configuration

Asus
TP-Link
Xiaomi
Zyxel
Tenda
MikroTik
Keenetic
D-Link
Other

This instruction will help you configure a VPN connection on an Asus router with the basic stock firmware, using OpenVPN and PPTP protocols.

Most Asus routers are VPN-ready out of the box, so you won’t need to do anything extra with the firmware. Just learn and input the necessary VPN parameters in the interface.

List of tested router models: Asus RT-N16, Asus RT-N18U, Asus RT-N66U, Asus RT-AC66U, Asus RT-AC68U, Asus RT-AC87U, Asus RT-AC3200.

If you’re just selecting a good popular router for yourself and want to easily set it up to work with a VPN in the future, pay attention to the device’s specifications in recommendations, comments, and ratings. Make sure that among other useful features, it mentions "VPN" support. For example, here’s an example of such a suitable router.

Now let’s move on to the setup:
Preliminary Stage

During the preliminary stage, you need to perform the main basic configuration of the router. This needs to be done only once. You won’t need to go into these sections and configure anything there in the future.

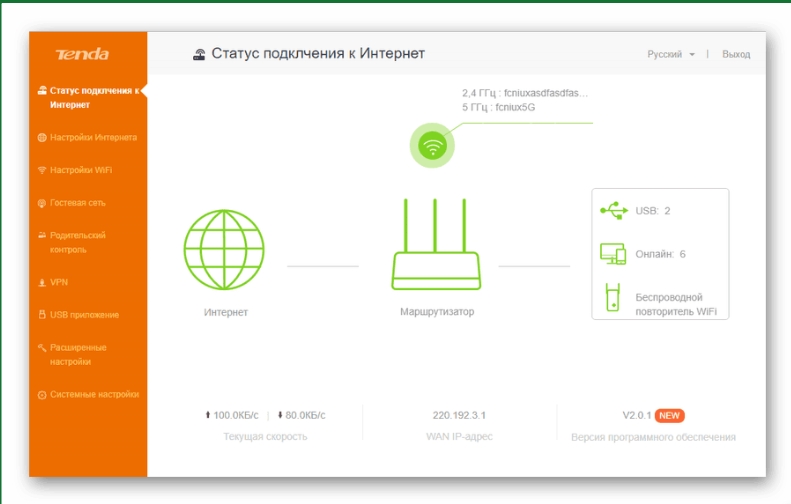
Any router configuration starts with accessing its control panel. To access the Asus router interface, go to http://192.168.1.1/ in your browser and log in.

The login and password information is located on the router’s body on the back side. Typically, it’s admin/admin. It’s recommended to change the default password to a more complex one later on.

Step 1: Open the  Internet  section, which is located in the navigation on the left. Alternatively, click on the link: http://192.168.1.1/Advanced_WAN_Content.asp

Enter the parameters in the respective fields:

  • WAN Connection Type: Automatic IP
  • WAN, NAT, and UPnP: Yes
  • Connect to DNS Server Automatically: No
  • DNS Server 1: 1.1.1.1
  • DNS Server 2: 8.8.8.8
  • DHCP Query Frequency: Aggressive Mode

Click  Apply  to save the settings.

Step 2: Go to the  IPv6  section: http://192.168.1.1/Advanced_IPv6_Content.asp

  • Connection Type: Disabled
  • Enable Router Advertisement: Disabled

Click  Apply .

This completes the preliminary setup stage. Now, choose the VPN connection option: PPTP/L2TP for simpler setup, OpenVPN for slightly more advanced configuration.

PPTP / L2TP

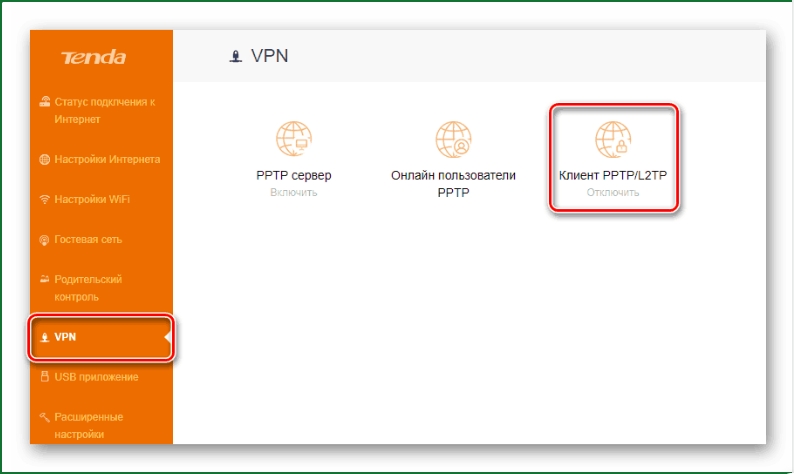
Go to the  VPN  section, then select the tab labeled  VPN Client . Alternatively, you can follow this link: http://192.168.1.1/Advanced_VPNClient_Content.asp

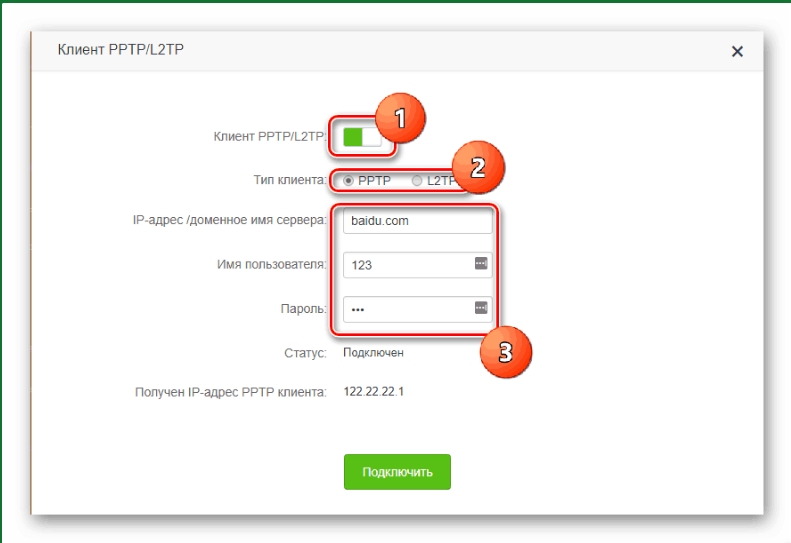
Now let’s add a profile. Click the  Add profile  button at the bottom, and a window will appear with fields for input: Description, Server, Username, and Password.

To continue configuration, you need to know the access code for our service.
You can obtain it after purchasing, or by requesting a trial period.

  • Description:
  • Server:
  • Username:
  • Password:
  • IPSec (PSK): incloaknetwork

After filling out all the fields, click  OK . A new line will appear, and on the right, there will be a  Connect  button. Click it, and the connection should be successful. A checkmark will appear on the left.
Upon successful connection, check if your IP address has changed.

OpenVPN

Let’s note that setting up OpenVPN is a bit more complex than PPTP / L2TP, but the difference in method will take just a few minutes of your time.

Go to the  VPN  section, then select the  VPN Client  tab at the top. Alternatively, you can follow this link: http://192.168.1.1/Advanced_VPNClient_Content.asp

Now let’s add a profile. Click the  Add profile  button at the bottom, and a window will appear with a tab labeled  OpenVPN .

To continue configuring the VPN functions, you’ll need the access code for our service. You can obtain it after payment, or by requesting a trial period.

After loading the configuration file, click  OK .

A new line will appear in the table, and on the right, there will be a  Connect  button. Press it. The connection should be successful, and a checkmark will appear on the left. Upon successful connection, check if your IP address has changed.

This guide will help you configure a VPN connection on your TP-Link router with the basic original firmware, using PPTP and L2TP protocols.

Most TP-Link routers are prepared to work with VPN out of the box, and no additional firmware modifications are needed.

If you’re choosing a router and want to easily set it up to work with VPN in the future, pay attention to the specifications. Among other features, it should mention VPN support. Here’s an example of such a router.

Now let’s move on to the setup:
Router Control Panel

Any router configuration starts with accessing its control panel. To access the TP-Link router, go to the address http://192.168.1.1/ or http://192.168.0.1/, and authenticate yourself.

Information about the login and password can also be found in the manual or on the back of the router. Typically, it’s admin/admin, and we recommend changing the password to something more complex.

PPTP / L2TP

Go to the  Network  section, then  WAN .

Now let’s set up the connection. At the top of the page, choose  PPTP/PPTP Russia  from the dropdown list. Below, you’ll find fields for Username, Password, and Server Address.

To continue the configuration, you’ll need the access code for our service. You could have obtained it after payment, or by requesting a trial period.

  • Description:
  • Server:
  • Username:
  • Password:
  • IPSec (PSK): incloaknetwork

After filling out all the fields, click  Save  at the bottom of the page.
Scroll back up and click the  Connect  button.
Upon successful connection, check if your IP address has changed.

OpenVPN

OpenVPN – a modern VPN protocol with high security features and fast speeds. Make sure your TP-Link router supports this protocol. Most TP-Link devices work with VPN using PPTP and L2TP protocols.

In the TP-Link router control panel, navigate to the VPN section and create a new profile. Choose VPN type as "OpenVPN" and use the "Import" button to specify the path to the VPN configuration file.

You can download these files from the link below. For this, you’ll need the access code for our service. You could have obtained it after payment or by requesting a trial period.

Check the "Enable" box, select the network you’re using, and click the "Create" button. Save the settings and restart the router.

Chinese smartphone manufacturer Xiaomi produces Xiaomi Mi Routers that are popular. These devices support virtual private networks (VPNs). With a VPN, you can bypass local restrictions, encrypt data transmitted over the internet, and hide the addresses you visit. Setting up the connection once can eliminate the tedious need to download apps and configure clients on each device. So, here’s how to set up a VPN on Xiaomi.

Now let’s move on to the setup:
How to Access the Xiaomi Router Interface for VPN Configuration

Access the device interface. You can find the address in the manual or packaging. Typically, it’s http://192.168.31.1. In the device interface, select the «Advanced» section, then the sub-item «VPN». In the connection settings, you’ll need to enter network and user information.

How to Obtain the hidemy.name Access Code for the Router

Beforehand, you’ll need to obtain the access code for hidemy.name. The service allows you to work without registering on the website - you just need to provide an email address where you’ll receive an email with the code. hidemy.name offers trial access, giving you the opportunity to assess the service and its benefits.

PPTP / L2TP Configuration
  • Description:
  • Server:
  • Username:
  • Password:
  • IPSec (PSK): incloaknetwork

Points that need to be configured in the device interface:

  • Name - the connection name (you can specify any convenient name).
  • Protocol - choose the connection protocol (by default, it’s PPTP).
  • Server - the VPN server’s IP address to which you’ll connect.
  • Username - enter the code received from hidemy.name here.
  • Password - the password for network access.

After entering the data, save them and activate the connection by clicking on "Connected." If the data is entered correctly, gadgets connected via Wi-Fi will work through a secure channel. You can check this using a service that identifies IP addresses.

OpenVPN Support

Instead of using PPTP, you can connect Xiaomi via OpenVPN. To use OpenVPN on the device, you need to download the configuration file. To download the configuration file, provide the access code for our service. You can obtain it after payment or by requesting a trial period.

Select the "VPN" section in the router’s control panel, choose the connection type "OpenVPN," and upload the configuration file to the router.

The main advantage of VPN on a router is that all devices connected to Wi-Fi will be securely protected from data interception and will be able to bypass the provider’s local restrictions. There’s no need to configure the connection and download a client for each device. Let’s consider setting up a VPN for Zyxel models usg20-vpn, usg20w-vpn, usg, 20w.

Now let’s move on to the setup:
How to Access the Zyxel Router Interface for VPN Configuration

The router interface is accessible at the address 192.168.1.1. Before proceeding with configuration, ensure that the "IPsec VPN" component is active. Go to settings, select "Change component set," and activate the relevant item.

Step two. Go to "Other connections," choose "VPN connections," and click "Add connection." Now you need to enter the data for VPN configuration.

Visit the hidemy.name service website. In the "Download" section, go to "Routers." Obtain parameters for PPTP connection or the configuration file in ovpn format. Zyxel allows you to use any suitable protocol - OpenVPN, PP2P, L2TP.

How to Obtain the hidemy.name Access Code for the Router

Registration is not required to work with hidemy.name - an email address where the access code will be sent is sufficient. The service offers a free trial period.

PPTP / L2TP

In the "Connection Setup" window of the router, perform the following actions. Firstly, make sure the checkbox in the "Enable" field is selected to activate the created connection and the "Use for Internet access" field is checked.

Next, in the "Type (Protocol)" field, specify the connection protocol you need, such as "PPTP."

In the "Connect via" field, specify the interface for network communication.

For further settings, you need to know the access code for our service. You could have obtained it after purchase or by requesting a trial period.

  • Description:
  • Server:
  • Username:
  • Password:
  • IPSec (PSK): incloaknetwork

In the "Server Address" field, enter the IP address of the server you received. In the "Username" and "Password" fields, enter the provided data. Check the box for "Data Encryption."

Click the "Apply" button to save the settings.

OpenVPN

If your router’s firmware supports the OpenVPN protocol, you can upload a ready-made configuration file to connect to the VPN on the router.

To download the configuration file, you’ll need the access code for our service. You could have obtained it after payment or by requesting a trial period.

Upload the configuration file to the router, save the settings, and restart it to establish a VPN connection.

Modern Chinese Tenda routers support several Wi-Fi standards and provide fast and stable internet connections. The Tenda routers support VPN "out of the box."

Connecting the router to a virtual private network allows all devices in the home network to bypass the provider’s local restrictions and access any resources. All transmitted data is encrypted, and the provider cannot track which websites the user visits. Additionally, configuring VPN on the router saves time and effort. There’s no need to download and configure VPN clients on each device. In any case, the VPN mode can be deactivated if necessary.

Now let’s move on to the setup:
How to Access the Tenda Router Interface for VPN Setup

To access the device interface, open your browser and go to the address 192.168.0.1. The IP for accessing the device’s control panel is indicated on the back of the device. The default login and access code are also provided there. It’s advisable to change this information after setup.

Guide on How to Configure VPN on Tenda Router

In the control panel, select the VPN section. In newer models, this option is available in the orange menu on the left. Next, choose the "PPTP/L2TP Client" section.

Guide on How to Configure VPN on Tenda Router

Select the protocol type through which the router will connect to the VPN - either PPTP or L2TP. L2TP protocols ensure encryption of transmitted data and establish a secure connection. The settings are the same in both cases.

Guide on How to Configure VPN on Tenda Router

How to Get the hidemy.name Access Code for the Router

To properly configure the system, you need to obtain connection details.

For this, you’ll need to know the access code for our service. You could have obtained it after purchase or by requesting a trial period.

  • Description:
  • Server:
  • Username:
  • Password:
  • IPSec (PSK): incloaknetwork
Setting Up PPTP / L2TP

Retrieve the code and obtain the connection details. Now, you need to enter them into the appropriate fields:

  • Server IP Address/Domain Name - enter the location data you’re connecting to.
  • Username - the hidemy.name access code serves as the login.
  • Password.

If the IPSec option is available, enter "incloaknetwork."

Configuring VPN

If everything is entered correctly, Tenda will connect to the secured network after you activate the "PPTP/L2TP Client" switch above the settings. You can check its functionality from any gadget connected to Tenda - the device IP addresses should change.

To deactivate the secure channel, simply shift the switch above the settings. User access can be controlled through the "Online PPTP User" section in the VPN menu. You can also create your own secure node there.

OpenVPN Support

Make sure your router supports the OpenVPN protocol. Go to the VPN section and select the appropriate protocol. Then, upload the configuration file for the VPN connection to the router.

To download the configuration file, you’ll need the access code for our service. You could have obtained it after payment or by requesting a trial period.

Setting Up VPN Server on Tenda

Setting Up VPN Server on Tenda

From the VPN section, select the option with "Server." This section allows you to launch your own secure node, which enables user connection control. You’ll need to input the following parameters:

  • Address Range for devices connecting to the Server.
  • Select the MPPE encryption method. More secure 128-bit keys are recommended.

After saving the parameters and launching the node, users will be able to connect to the router as a VPN. The connection address can be obtained from the device information section in the Tenda information panel. Naturally, the gadgets should have active secure connections.

Thus, all connections within the local Wi-Fi network will be secured. If critical data (such as financial information in an office) is transmitted over your network, this method prevents interception or substitution.

The MikroTik brand has a large following due to its combination of affordable equipment prices and advanced functionality. MikroTik routers are equipped with their own operating system, RouterOS, which offers a wide range of capabilities.

The developers of RouterOS based their product on Linux. The system works on all models of MikroTik devices and even has a client for computers. This allows local settings to be easily transferred and edited when changing devices. Compared to Dlink, TP-Link, Zyxell, and other "home" routers, MikroTik routers with RouterOS offer immense functionality.

Advantages of MikroTik routers with RouterOS:

  • MikroTik VPN support.
  • Management through dedicated applications and command line.
  • Support for scripts executed under specific conditions.
  • Built-in firewall for traffic.
  • Support for virtual routing tables.
  • Support for OSPF, BGP, VPLS/MPLS, PPTP, L2TP, IPSec.
  • Port forwarding for accessing devices in the network from the outside.

The downside is the somewhat complex setup. Although there are user-friendly applications for working with the system, understanding the basic setup specifics is necessary. This router is unlikely to suit those who expect the router to work out of the box, in a "plug-and-play" manner.

As an example of the need for serious equipment setup, consider the case of a DDoS attack on Yandex in September 2021. This was a powerful local attack in the Russian Internet on a search engine site. The initiator was a virus that infected 200 thousand MikroTik network devices. It entered routers because some users didn’t change the default passwords and didn’t update the RouterOS system after activation. Working with MikroTik requires a certain level of knowledge.

Now let’s move on to the setup:
Using VPN in MikroTik

Using VPN has long become a mandatory attribute if you care about your own security on the network. A virtual private network encrypts all transmitted data and allows you to bypass restrictions.

When a VPN is needed on a router:

  • Remote office. Access is needed to the corporate network for enterprise employees who work remotely.
  • Connecting to VPN devices that do not support this technology.
  • The ability to set up a secure network for all home devices in one go. No need to install a VPN client on a new gadget.
  • Connecting remote branches through a secure communication channel with minimal costs.

You can use it as a local secure server or existing specialized services. The server can be located abroad as well. Next, we will explain how to connect the router to the site hidemy.name so that users access the internet through a reliable secure connection.

To configure VPN operation in MikroTik, you can use the following protocols: PPtP, PPPoE, OpenVPN, L2TP, IPSec. Let’s take a closer look at creating secure virtual networks using PPtP, IPSec, and OpenVPN.

How to Access the MikroTik Router Interface for VPN Configuration

You can perform router configuration in several ways. The router\s web interface is accessible at the address 192.168.88.1. There is a special program called Winbox for Windows that you can download from the manufacturer\s official website and connect to the device through it.

Instructions on how to set up VPN on the MikroTik router using Winbox:

  1. Start your route from the PPP section in the program.
  2. Select the Interface option and click the plus sign next to "PPPoE Client."
  3. In the settings window, on the General tab, in the lower row, select the interface and port through which the router is connected to the server.
  4. On the Dial tab, enter the data for connecting to the VPN service.
How to Obtain hidemy.name Access Code for the Router

To perform accurate system configuration, you need to obtain connection details. For this purpose, you need to know the access code for our service. You could have obtained it after purchase or by requesting a trial period.

  • Description:
  • Server:
  • Username:
  • Password:
  • IPSec (PSK): incloaknetwork
Configuring PPTP / L2TP

On the Dial tab, enter the received data:

  • In the User field, input the access code from hidemy.name
  • In the Password field, enter the received password.
  • Check the Use Peer DNS option.
  • Uncheck the Dial on Demand option.
  • In the Allow section, activate the necessary items - pap, chap, mschap1, and mschap2. hidemy.name supports various encryption protocols. Choose the appropriate one. The IPSec PSK encryption key value used is "incloaknetwork".
  • Click Apply and then OK.

How to Access the MikroTik Router Interface for VPN Configuration

If all data was entered correctly, the router connects to the virtual private network, and Wi-Fi will function through it.

OpenVPN Support

There are no fundamental differences in setting up a VPN based on the OpenVPN protocol compared to PPTP. Before starting the router configuration, you’ll need to obtain a local configuration file with the .ovpn extension.

To download the configuration file, you will need the access code for our service. You could have obtained it after payment or by requesting a trial period.

Currently, RouterOS does not support tls-crypt nor tls-crypt-v2. Please choose an option without obfuscation, or if you really need to, install your own OpenVPN client using the container feature available starting from RouterOS 7.5 (not covered by this manual).

The file stores connection parameters used by OpenVPN to work with virtual networks. We’ll need to open it and extract the certificate and key files for OpenVPN, which should be loaded into Winbox. If your OS’s local tools don’t allow you to extract the extension, download the client from the openvpn.net website. After extracting the ca.crt, client.crt, and client.key documents from the ovpn file, you should load them into the Winbox program.

Similar to the previous setup method, create a new OVPN Client entry and on the Dial tab, enter the connection details for the VPN. Then, using the menu "System"> "Certificates"> "select certificate," import the previously obtained files.

OpenVPN Support

Another useful feature is port forwarding. Port forwarding is used to transmit data from the internal network to the outside. Configuration takes place in the Firewall section, where you should specify To Addresses to forward data from the internal device. Use port forwarding carefully, as it can potentially lead to device vulnerabilities.

Keenetic — a brand that is part of the international network equipment manufacturer Zyxel. In recent years, the brand has been gaining a significant share of the home router market. Naturally, many of the devices are modifications of Zyxel products. Configuring VPN on Keenetic is often identical to Zyxel.

VPN creates an encrypted and secure connection, blocks tracking by the provider, and allows access to blocked resources.

Now let’s move on to the setup:
VPN Features on Keenetic Router

Advantages of VPN on Keenetic:

  • Possibility to connect home devices to blocked services.
  • Encryption of transmitted data.
  • Connection of devices that do not support VPN.
  • Setting up the network only once.
  • Encrypted SSTP tunnel.
  • Support for different protocols: PPTP, L2TP, IPSec, and OpenVPN.
  • Traffic routing through a secure network.

Unfortunately, not all routers support VPN connections. Usually, information about this is included on the device’s packaging. By the way, the device allows you to create an SSTP server.

Let’s consider the process of connecting a Keenetic router and configuring routing to the hidemy.name service. The service has convenient clients for Windows, macOS, Android, and iOS.

How to Access the Keenetic Router Interface for VPN Configuration

The router interface is available at the address 192.168.1.1. Most often, the default username, port, and password are printed on the back of the device. The setup instructions are applicable to models 2, 3, 10, Giga, Giga SE, Giga KN-1011, Omni, Hero 4G, Viva, Ii, Extra, Lite, and Ultra.

You can install the client on your smartphone. Simply point your device’s camera at the barcode on the back of the device and install the app.

Don’t forget to change the login credentials for the control panel. Before starting the routing configuration, check the Keenetic firmware version and update it if necessary.

First, check if the component responsible for networking is enabled on the router. To do this, go to the "Show Components" section. Verify that the "IPsecVPN" option under the "Applications" section is enabled. To activate SSTP, which is required for creating an SSTP server, choose the corresponding component.

How to Access the Keenetic Router Interface for VPN Configuration

Next, go to the "Internet" section and select the "PPPoE/VPN" tab. Click the "Add Connection" button. In the popup window, provide the connection details for VPN.

How to Get hidemy.name Access Code for the Router

Connection information is available on the hidemy.name website. Go to the "Download" section and select "Router." Choose the device model, and in our case, select "Other." Enter the network access code. hidemy.name provides it after purchasing services. You can also use the trial period. No need to register on the site, just provide an email address where the code will be sent.

Enter the code on the hidemy.name page dedicated to router settings and obtain the data for Keenetic (IPsec, PPTP, L2TP, etc.).

Setting Up PPTP / L2TP
  • Description:
  • Server:
  • Username:
  • Password:
  • IPSec (PSK): incloaknetwork

Expand the appropriate section - PPTP and L2TP, and enter the data in the router interface as follows:

  • “Enable” - activate the option.
  • “Use for Internet Access” - activate the option.
  • “Description” - any convenient connection name.
  • “Connect via” - interface through which you are connected to the internet.
  • “Username” - the access code from hidemy.name.
  • “Password” - password for private network access.
  • “Secret Key” (IPsec) - enter “incloaknetwork”.
  • “Authentication Method” - choose CHAP.
  • “Server Address (server)” - hidemy.name server.
  • “IP Settings” - select “automatic”.
  • “Automatic Adjustment of TCP-MSS” - check the box.

Setting Up VPN

After entering the data, click “Apply” and go to the “Connections” section. If configured correctly, the router will connect to the network. Ensure that the created connection has the highest priority.

OpenVPN Support

If you plan to use the OpenVPN protocol for network communication, instead of IPsec, you need to install the “OpenVPN Client” component in the system. The configuration of connection parameters to the virtual private network is similar to the points mentioned above. You will need to download the configuration file in .ovpn format. You can obtain it from hidemy.name. Select the OpenVPN section located below PPTP, enter the access code, and download the file.

An increasing number of users are utilizing virtual private networks (VPNs) when accessing the internet. VPNs allow bypassing local provider restrictions. A private network prevents websites from determining the user’s location. Additionally, all transmitted data is encrypted, which prevents the leakage of sensitive information. Home and work Wi-Fi networks can be connected to VPN services, eliminating the need for individual device configuration. Let’s explore how to set up a client on D-Link DSR series VPN routers.

Now let’s move on to the setup:
Benefits of Setting Up VPN on D-Link DSR

Using VPN on a D-Link router, through which users are connected to the internet, offers the following advantages:

  • Constant VPN connection.
  • Protection of transmitted data from leaks.
  • Access to blocked resources.
  • No need to install and configure a VPN client on each device.
  • All devices connected to the router act as a single VPN device.
  • Connectivity for devices that do not support this technology.

In the latter case, the ability to connect home multimedia devices to services that are not available in certain regions will become available.

Accessing the D-Link Router Interface for VPN Configuration

The interface of the control panel may vary in different models of D-Link routers. It is usually localized, and there might be some variations in menu translations. D-Link DSR equipment is configured using the same principles.

Usually, the router’s control panel is accessible at the address 192.168.0.1. You can find the exact network IP address of the D-Link DSR in the device’s manual or on its back side. The default username and password will also be indicated there. Often, for D-Link routers, the default username is admin, and the password field might be left empty. Don’t forget to change the authorization data after entering all the necessary settings. New router models support SSL certificates, which provide access only to specific users. To install SSL on the router, go to the "Objects" section and use the "Add" option to upload the SSL certificate file.

In the device’s control panel, choose the category with advanced parameters. Then navigate to the "Network" section and select "WAN." In the connection parameters, click "Add."

In the new tab, choose the required connection type. Go to the "VPN" subsection and enter the data for connecting to the virtual private network.

Accessing the D-Link Router Interface for VPN Configuration

For correct configuration of the router’s operation with hidemy.name, you will need to obtain the access code for the client.

How to Get the Access Code from hidemy.name for the Router

To perform correct system configuration, you need to obtain connection details. For this purpose, you need to know the access code for our service. You could have received it after purchase or by requesting a trial period.

  • Description:
  • Server:
  • Username:
  • Password:
  • IPSec (PSK): incloaknetwork

No registration is required to work with hidemy.name. Just provide your client email address. You can use a trial period to assess the advantages of the network.

PPTP / L2TP Configuration

PPTP / L2TP Configuration

Fill in the settings (IPSec, PPTP, username, etc.) obtained in the previous step:

  • Connection Type: Russian PPTP DualAccess (PPTP in older firmware).
  • «Server IP/Name» — the server address of hidemy.name.
  • «PPTP Account» — your hidemy.name access code as the username.
  • «PPTP Password» — password for hidemy.name access.
  • «Retype Password» — re-enter the password.
  • «Connect mode select» — «Always — on».
  • «WAN Physical Setting» — choose «Dynamic IP».

For the IPSec PSK encryption key (needed for authentication), use the value «incloaknetwork». Save the configuration and reboot the device. If all the data is entered correctly, D-Link DSR will connect to the network, as well as all devices connected to it.

OpenVPN Support

OpenVPN is a modern VPN protocol with high security parameters and speed.

In the router control panel, select the VPN section and then OpenVPN. Choose the section to upload certificates to the router and specify the path to the downloaded .ovpn file from our website.

To download the settings file, provide the access code to our service in the field below. You could have received it after purchase or by requesting a trial period.

This guide will help you set up a VPN connection on any router that supports this feature "out of the box".

In the router settings, there should be a section called "VPN" or "VPN Client". You should have the option to choose a protocol, which can be PPTP, L2TP, or OpenVPN.

If you’re selecting a router and want to easily set it up to work with VPN in the future, pay attention to the specifications. Among other features, it should mention VPN support. Here’s an example of such a router.

Now let’s move on to the setup:
Preparatory Stage

Any router configuration starts with accessing its control panel. The address of this panel is indicated in the router manual and might be at http://192.168.1.1/, http://192.168.0.1/, or a similar address. After reaching the correct address, your browser will ask for your login and password.

Information about the login and password can also be found in the manual or on the back of the router. Typically, it’s admin/admin, and we recommend changing the password to something more complex.

PPTP / L2TP

Go to the  Network  section, then to  WAN .

Now let’s configure the connection. At the top of the page, select  PPTP/PPTP Russia  from the drop-down list. Below, you’ll find fields for Username, Password, and Server Address.

To proceed with the setup, you’ll need the access code for our service.
You could have obtained it after payment or by requesting a trial period.

  • Description:
  • Server:
  • Username:
  • Password:
  • IPSec (PSK): incloaknetwork

After filling in all the fields, save them, then click on the connection.
Upon successful connection, check if your IP address has changed.

OpenVPN

It’s worth noting that OpenVPN is supported by fewer routers by default compared to the more common PPTP and L2TP. However, if you find a section named "OpenVPN" in your router’s control panel, chances are you can successfully set it up to work with this protocol.

To proceed with the setup, you’ll need the access code for our service.
You could have obtained it after payment or by requesting a trial period.

The configuration files in .ovpn format are included in the archive, and they already contain certificates and keys. Upload them to your router’s settings. Usernames and passwords are not required, leave them empty.

A Bit More About VPN on the Router

Installing our service on a router differs slightly from installing it directly on a computer, laptop, or mobile device. However, it will save time in the long run. The router will protect various devices connected to it, from PCs to smartphones. If you frequently have new people with different gadgets coming to you, there’s no need to search for and install various versions of VPN applications. The default network will already be secure. No need to search, download, and configure clients for iOS, Windows, and so on. Very convenient!


To secure your entire home network at once, use the settings available after entering the access code in the above instructions.


Before subscribing, you can use a free one-day trial. The trial period provides unlimited-speed network services. Annoying personalized ads won’t appear, you can access any streaming services, receive files of any extensions, connect to games, and not be subject to provider restrictions. All important internet protocols are supported during testing and beyond. The service price depends on the chosen subscription period. If it’s longer than a month (for example, a year), certain discounts apply to the purchase. All modern payment methods are supported. Options include e-money, cards from any country (including RF/Russia), and anonymous cryptocurrencies.


VPN on the router works for both wired and WiFi connections.


Connecting to a VPN provides:


  • unrestricted access to blocked and unavailable websites in your country;
  • complete security and privacy of actions in the network — all traffic goes through our server IPs;
  • encryption of all data;
  • security of passwords, transmitted data, online conversations.

Because we support a large number of servers, each of them experiences a small network load. This means fast and reliable VPN connection on the router and connected devices for our users.


Working without a VPN always carries a high risk that important data may be compromised, intercepted, or even deleted. VPN offers the highest level of protection.


If you have questions about setting up and using VPN on the router, most of them are covered in the help and support section, where detailed instructions are provided. You can always contact customer support, which will help you solve any issues that arise. The website has a news blog with information about site blockages, cases of personal data and password leaks, news, and original articles about security and anonymity on the network.